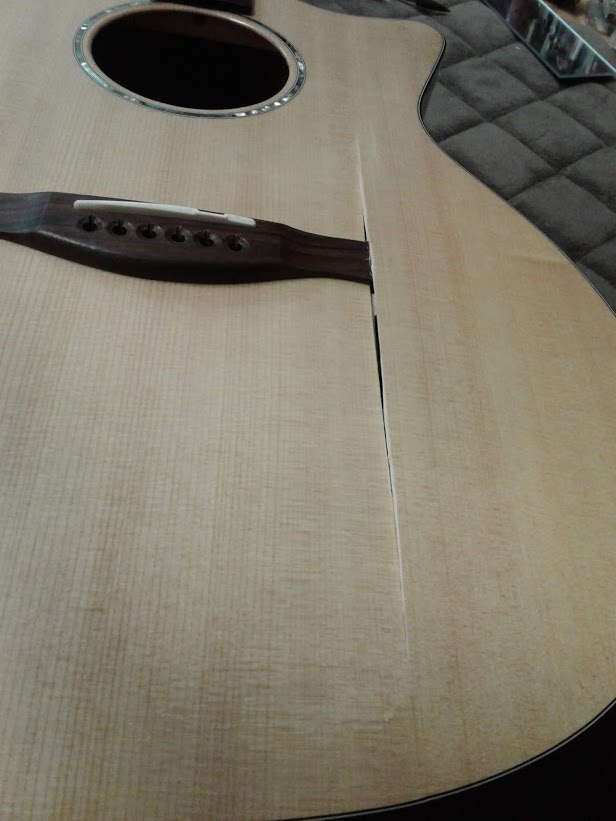
We were pretty shocked when we unboxed this guitar to find that it had been badly damaged during shipping. It must have taken a very hard blow to the top. As you can see in the pictures we have a crack about 14″ long. There were a couple of other smaller cracks which will have to be dealt with as well, and the four braces that crossed the split had come detached from the top. We decided it would be a good opportunity for the apprentice to gain some experience on a big job.
The crack actually passed under the bridge and the impact must have been pretty dramatic, as the spruce is popped up and over the rosewood. It would have been extremely difficult to get the top back under the bridge without losing a bunch of wood and damaging more finish.
In order to have as clean a final product as possible we decided to remove the bridge before gluing the crack back up and replacing the bridge. While we’re at it might as well make this guitar better than it would have come from the factory, had it been intact. 99% of commercially built guitars will leave an area of finish under the bridge so the seam between bridge and top looks flawless. While it does look clean, there is very little wood to wood contact at this critical joint, as the edges of the bridge are resting on a film of finish leaving a gap that will hopefully be filled with glue. The trade-off is a significant loss of tone, volume and clarity, as well as a tendency for the bridge to come unglued and lift over time. So we are going to get Kevin to properly clean away the finish from this area under the bridge before re-gluing. This involves carefully scoring around the outline of the bridge and very carefully and delicately scraping away the finish. It is very important that you don’t cut too deeply, damaging the wood fibres which would be a serious detriment to the longevity of the bridge/top joint.
Preparing to remove the bridge using heat and a pallete knife. The cardboard protects the finish and the thinner top wood from the intense heat.
After the bridge has been removed and both surfaces cleaned up and mated nicely. The dictionary definition of tedious and precise.
Clamping set up for sealing the crack using hot hide glue.
After repairing the cracks 4 braces had to be glued back to the top, and 7 cleats were glued in across the cracks to reinforce the area.
Clamping set up for gluing the bridge back on.
In the end we have saved not only a useable instrument, but a very nice sounding one at that, thanks to Eastman’s initial craftsmanship and material choices, and our own improvements to the bridge/top joint. It plays beautifully at a lower action than most guitars, which means the neck angle, fingerboard and fretwork are all exceptional. It is showing a few cosmetic flaws but the guitar will have a long life, if taken care of.
After all, we all have our own scar tissue don’t we?


